Tuesday, September 25, 2012

WORKING WITH OUR FIRST PHOTOSHOP FILE


We begin working with Photoshop, we may be convinced that Adobe’s flagship image editor has approximately 8,192 different menu selections for us to choose from. In truth, Photoshop has only about 500-plus separate menu items, including some duplicates.

That figure doesn’t count the 100 or so entries for filter plug-ins. However, even 500-plus menu items are considerably more than we find in the most ambitious restaurants. Basically, if we want to do something in Photoshop, we need to use the Menu bar. If we’re using the Mac OS, the Photoshop Menu bar may share space with Finder components.

The following sections offer a summary of what we can find and where we can find it.

Photoshop also helps us by providing efficient context menus, which change their listings depending on what we’re doing. We don’t see options we don’t need; we see options appropriate to what we’re working on. Right-click to bring up the menu.


Opening, Printing and Saving files

            The file menu gives this three options it is as simple as how we are opening, printing and saving any document in the simplest programs.

If we want to OPEN any file just we have to press “Ctrl+o” or go to the FILE menu and click the submenu OPEN and select the Image on which we want to work.

If we want to Print any document just we have to press “Ctrl+p” or go to the FILE menu and select “Print…” submenu.

And last if we want to save our work than we can use “Ctrl+s” shortcut or we can follow FILE menu and we can select the sub menu “Save”.
Photoshop saves the edited file in the default format “*.psd” and Photoshop also supports other extensions which are listed in following figure.
 
Photoshop CS5 Images save Extensions Demo Image
                                        
Making Selections:
 
Photoshop Selection Tools Demo Image             
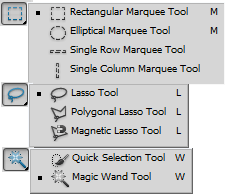
Selections let we work with only part of an image. We can select an entire layer or only portions of a layer with one of the selection tools, such as the Marquee or Magic Wand tool.
The Select menu offers several commands to modify your selection from capturing more pixels to softening the edges of the selection.
 
The Select menu is short and sweet, but the capability and control that the menu unleashes is nothing short of an image-editing miracle which is shown as under.
 
Understanding selections is such an important cornerstone to our Photoshop knowledge that will be specified latter when we get full basic knowledge about Photoshop.

Photoshop CS5 Select Menu Demo Image


Making Simple Image Editing:

            The Edit menu contains tools that enable us to cut, copy or paste image selections in several ways.

            We can fill selections or stroke their outlines, which I explain in more detail in future session.

            We can use the Edit menu to rotate, resize, distort, or perform other transformations on our selections.

            Additionally, we can undo the last changes we made in Photoshop, fade a filter, check your spelling, or find and replace text.
 
Photoshop CS5 Edit Menu Image Demo
 

Adjusting size, color, and contrast
 
We’d think the image menu might have something to do with making changes to an entire image document, wouldn’t we? In practice, some of the entries you find here do apply to the whole document, but other can apply to only particular layer or selections.
 
Photoshop CS5 Image Menu Demo Image

            For example, the MODE menu allows us to change full image from color to grayscale. The Image Size, Canvas Size, Image Rotation, Crop, and trim selections all change the whole document in some way.

            On the other hand, we can only apply the changes wrought from the Adjustments submenu to an entire image if the document consists of only a background and has no layers,

            If the document has more than one layer, then adjustments such as Color Balance, Hue/Saturation, or Levels work only with a single layer or a selection on that layer.

            The Variables and Apply Data Set commands work with data-driven graphics. Briefly, data-driven graphics make it possible to quickly produce multiple versions of an image for print and Web Projects.

            Multiple versions allow for target audience customization for projects such as direct mail pieces. For example, we can base hundreds of versions of a brochure or Web banner on a single template.

            The Variables define which elements change within a template. A Data Set is a collection of variables and associated data.

            We’ll find ourselves turning to the image menu more often than many of the other menus, partially because it’s so useful and partially because, for some reason, many of the options don’t have keyboard shortcuts that let we bypass the menu.

 
Creating Layers 

            Layers give us a way of stacking portions of an image — like sheets of acetate — on top of one another so that we can work on individual pieces separately. Then, when we’re satisfied with our changes, we can either combine the changes into a final image or leave them in layers for maximum editing flexibility.(IN PHOTOSHOP EVERY NEW COPY AND PASTE MAKES A NEW LAYER IN .PSD PROJECT)

            Lets we create new and duplicate layers, delete one or several layers, change layer properties (such as a layer’s name), or add special features, such as drop shadows or beveled edges, to objects in a layer. We can also create special kinds of layers to make adjustments or mask portions of an image. The menu has selections for changing the order of the layers (moving a specific layer to the front or top of the stack, and so on) and grouping layers.

Following figure shows different four layers one layer have a cartoon second layer have the signature third layer have the purple background with transparency and forth layer have simple white background these all we can see at the right hand side in figure.

Photoshop Layers Demo Image


            We also can merge layers down, combine them with all other visible layers, or flatten them into one single-layer image (or background). Although consolidating our layers makes the file smaller, flattening is irreversible after we close the file. Storing an unflattened version of a file is always a good idea in case we want to make more changes later on.


WILL BE CONTINUED THIS POST... 

Monday, September 3, 2012

PLAYING WITH PANELS

            Many image-oriented programs use the panels of a sort, and Photoshop has had panels since version 1.0.

            Since Photoshop 3.0, the program has used a novel way of working with panels. Rather than standalone windows, Photoshop uses grouped, tabbed panels, which overlap each other in groups of two of three.

            To access a panel that falls behind the one displayed on top, click the panel’s tab. By default, some panels, such as Tool Presets, appear alone.

            Panels may contain sliders, buttons, drop-down lists, pop-up menus and other controls. We also find icons at the bottom of many panels. Observe the following figures which have the screenshot of the panels which contained icons to maintain your image.

Panels of Photoshop Demo Image
Whatever name we call them, palettes or panels, they still hold the same information. They’re streamlined and easily tucked away and expanded, as needed. By default, the panels are anchored in the top-right by a multitier dock.
Here’s how to open, close, and otherwise manipulate a panel group, which can be accessed easily from the Window menu:
 
 
®    To expand a panel: Panels are represented by icons when collapsed. To expand a panel, simply click its icon. We can also select a panel by choosing it in the Window menu.
 
®    To bring a panel to the front of its group: When the panel group is expanded, the visible panel is the panel that has a check mark next to it on the Window menu. In this mode, we can select only one panel in any group because only one tab in a group can be on top at one time. When we select a panel from the Window menu, we have no way of knowing which panels are grouped together because Adobe lists panels alphabetically, rather than by groups. To bring a specific panel to the front, click its tab (when expanded) or icon (when collapsed).
 
®    To move a panel out of its group: Grab the panel’s tab with our mouse and drag it to its new location, such as another group, the panel dock, or the Photoshop desktop. If we move the panels out of their groups or drag them onto the desktop so they stand alone, any of them can be selected in the Window menu.
 
®    To collapse a panel: Click the gray area next to the tab.
 
®    To close a panel: Select a check-marked panel in the Window menu. The whole panel group closes. We can also select Close or Close Tab Group from the panel’s pop-up menu. Here are some more panel-manipulation tips:
 
®    Expand or collapse the dock: To do so, click on the double triangles at the top of the dock.
 
®    Reduce a panel to its icon: Drag the panel by its tab and position it below the existing column of icons. Release mouse button to make the panel collapse to its corresponding icon.
 
®    Save space by keeping panels in groups: We can move all the panels in a group by dragging the gray area to the right of the group’s tab. Access an individual panel by clicking its tab to bring it to the front. As a result, several panels occupy the screen space required by only one.
 
®    Use the Window menu if we can’t find a panel: On the Window menu, select the panel’s name to make it visible or to bring it to the top of its group.
 
®    Customize, customize, customize: After we use Photoshop for a while, creating our own custom panel groups based on the panels we most often use can be a real timesaver. For example, if we don’t use the Paths panel very often but can’t live without the Actions panel, we can drag the Paths panel to another group or to the panel dock area, and put the Actions panel in the same group as the mission-critical Layers and Channels panels.
 
®    Restore default panel locations, when desired: If we decide we don’t like the way we’ve arranged our panels, we can choose WindowWorkspaceEssentials
(Default) to return them to the default.
 
Many panels allow us to reset the settings back to their default. Too do, select Result from the panels pop-up menu located in the top-right connect


Saturday, September 1, 2012

SETTING UP THE STATUS BAR


Every image window in Photoshop comes equipped with a status bar. Many people tend to associate status with wealth, so we think there’s a good reason to accept the free wealth of information that the status bar offers:

®    On the far left of the bar is a box that displays an active image’s current zoom level (such as 33.33%).  The title bars of the document also show the zoom level.

If we installed a Photoshop to network computer and we active the workgroup features, using which file sharing and other perks we can apply, we see the icon for the Workgroup Service pop-up menu just to the fight of the zoom-info box.

®    To the right of the zoom level is the display area for file and image information which, by default, shows the document profile.

To display other types of information, click the arrow which is right side to the status bar, choose Show, and select one of the options from the menu that appears.
 
Photoshop Statusbar Demo Image
 

Adobe Drive:

If we are Version Cue users, we can select this option, which enables us to connect to Version Cue servers. If we connect through the Adobe Drive, we can open and save Version Cue files. Adobe has decided to discontinue Version Cue, so the now the Adobe Drive feature is unknown.

Document Sizes:

            It shows the document size in two numbers. The first number (left one) shows the size of the file we were to combine all the layers into one and save it to our hard disk in the native Photoshop file format. The second number (right one) shows the size of the file including layers, channels and other components.

Document Profile:

            When we select this option the status bar displays the name of the color profile that the image uses, as well as the number of bits per channel.

Document Dimensions:

            Suppose we select this option then the status bar shows us the size of the image by using the default measurement increment we have set in Photoshop’s Preferences. It shows the physical dimension of the file which is currently open as well as selected to edit.

Measurement Scale:

            It displays the scale of the document. For example, 1 pixel=1.000pixels.

Scratch Sizes:

            The scratch space is the virtual memory set aside on our hard disk to simulate RAM and make editing large files easily. By selecting this option we can see two measurements for active image. The left one is the amount of real memory and virtual memory that all open images are using. The right one is the total amount of RAM available for working image.

Efficiency:

            It helps us gauge whether we really have enough RAM to perform a task. It shows the percentage of time Photoshop spends actually working on an operation, compared to the time it must spend reading or writing image information to or from our hard disk. The value dips below 100 percent most of the time, we need to allocate more memory to Photoshop.

Timing:

            This number shows us how long it took you to complete our most recent incredible feat.

Current Tool:

            This option shows us the name of the tool currently in use.

32-Bit Exposure:

            This option is for adjusting the preview image for viewing 32-bit High Dynamic Range (HDR) images. The slider control is available only if we have an HDR image open.

Thursday, August 30, 2012

SETTING DISPLAY SETTINGS WITH THE WINDOW MENU

The window menu looks like the following figure.

Photoshop Window Menu Demo Image

It controls the display of panels and some other elements of the Photoshop workspace.


®    The top two elements on the Window menu enable us to control the display arrangement of our open documents and manage our workspace.

o   On the WindowArrange submenu, we can tell Photoshop to cascade (stack) or tile (butt edge to edge) all open documents. Our images must be floating in their windows to enable this option (WindowFloat All in Windows). Example shown in following figure.

o   Photoshop also sports what’s referred to as an application frame. Open documents are tabbed together neatly, one stacked behind the other. If you yearn for the old days and want your images to float within the application, choose Float in Window (for the currently selected image only) and Float All in Windows (for all your images) commands in the Arrange submenu.

If we make all images in Photoshop as “Float All in Windows” then we can see all images with separate window and we can move it as we want like following figure.

Float All In Windows In Photoshop Demo Image


  Then suppose we click on “WindowsCascade” so it arranges all image like following figure.

Cascade Layers In Photoshop Demo Image
 
It arranges the image windows based on they are opened (first opened image goes at back and last opened image comes in front).

The following table shows us the lowdown about the other options on the WindowArrangeSubmenu.

Table
The WindowArrange Submenu
Menu command
What It Does
Consolidate
All to Tabs
Takes your open floating documents and tabs them together under the Options bar.
Match Zoom
Takes your open documents and matches the magnification percentage of your active document.
Match Location
Takes your open documents and matches the location of your active document. For example, if you’re viewing the lower-left corner of your active document and choose Match Location, all your open documents display from the lower-left corner.
Match Rotation
Takes your open documents and matches the canvas rotation of your active document.
Match All
Employs all Match commands simultaneously.
New Window
Opens another view of the same image, allowing you to work on a close-up part of the image while viewing results on the entire image.
Minimize
(Mac only)
Hides the image while placing the image’s thumbnail on the Dock. Click the thumbnail to restore the image in Photoshop.
Bring All to Front
(Mac only)
If you have multiple applications launched, thus multiple document windows open, this command brings all Photoshop documents to the front, ahead of any document windows from other open applications.

Tuesday, August 28, 2012

LAUNCH PHOTOSHOP & SCREEN INDRODUCTION


We start Photoshop the same as we launch any other program with Windows or the Mac OS. In Windows, we can launch programs from the Start menu or an icon on the taskbar. In Mac OS X, we may have a Photoshop icon on the Dock. In either Windows or Mac OS X, we can double-click a Photoshop shortcut or alias icon if we have one on our desktop. Finally, we can double-click an image associated with Photoshop, which then launches Photoshop along with the file.


SCREEN INDRODUCTION OF PHOTOSHOP CS5

When we launch Photoshop, the workspace, shown in Figure, appears. Photoshop desktop is a place for us to put all the images we’re working with.
 

PhotoshopCS5 Screen Demo Image


Within the Photoshop application window, we have variety of other windows and boxes, such as

®    Option bar shows the current tool property and we can set it from here.

®    Image window (Document Window) that enables us to view and edit images.

®    From Dock we can see the historical editing of the image and they are shown as layered form, as well as we can hide the Panels from here using navigation buttons.

®    The application window contains the stuff we’re probably used to seeing in other programs

®    A title bar at the top of the window.

®    A status bar at the bottom (unless you have it turned off) if we’re a Windows user, and menus to help us execute commands and get important information about our image files.

®    The arrangement of controls may be a little unfamiliar to us. Photoshop arranges controls into groups, or panels.